Recent Posts

Showing posts with label Simply Pretty Stuff. Show all posts

Wednesday, October 30, 2019

Make It Artsy With Lynne Suprock, Making Chihuly Like Ornaments Art Tutorial 22

Make It Artsy With Lynne Suprock, Making Chihuly Like Ornaments Art Tutorial 22

Well, season five of the show, Make It Artsy, on PBS, did not disappoint!  There are several talented instructors giving wonderful project instructions.  All PDF's for any of the episodes, whether the full videos are still shown on their website or not, are available through their website.  For the PDF written instructions for this whole project go to:

http://www.makeitartsy.com/projects/Make_it_Artsy_Series_500/503/Make_It_Artsy_503-2.htm

For season five, I completed and aired three projects with Julie Fei-Fan Balzer.  It was so much fun in their studio, surrounded by so many talented people.  One of the three projects was to create Chihuly inspired ornaments to float in ponds or to hang in trees.  The image below is a picture I took while at the Phipps Conservatory in Pittsburgh, PA for my inspiration. If you would like to see how I created my look alike,  just click the below the image!  Enjoy!


 https://www.youtube.com/watch?v=a3vByOoTqzs&t=5s

 Click Here!

Friday, September 20, 2019

Fast Image Transfer With No Rubbing, No Water, No Acetone, No Mess. Art Tutorial 21 by Lynne Suprock


Fast Image Transfer With No Rubbing, No Water, No Acetone, No Mess.  Art Tutorial 21
by Lynne Suprock

Yet again, one more time, for the 7th time, I filmed an episode with Julie Fei Fan Balzer on the PBS crafting show, MAKE IT ARTSY.
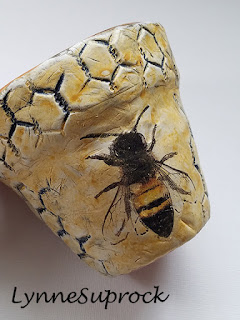
Such a wonderful time and how I loved meeting up with other creatives and filming these episodes.  In this episode I demo how to use Aves Fix It or Apoxie Sculpt to transfer images like toille and bees.

The last one aired is this September.  Check your local networks for Season 7 and tune in.  Also, for a complete written PDF of this project go to: 
http://www.makeitartsy.com/projects/Make_it_Artsy_Series_700/712/Make_It_Artsy_712-3.htm

Enjoy!


click here to view the how-to video:

Tuesday, June 4, 2019

Transforming An Ordinary Coat Into a 1940's Princess Coat, Art Tutorial 19, By Lynne Suprock

Transforming An Ordinary Coat 
Into a 1940's Princess Coat, Art Tutorial 19

By Lynne Suprock

Ou la.  There are several steps to transforming this community thrift store oversized woolen coat.  I put it all in this video...  Enjoy!


https://www.youtube.com/watch?v=uU2gnBzgv0A&t=19s


Thursday, May 3, 2018

Design A Plate Using Gel Press and Pebeo Paints, Art Tutorial 17

Design A Plate Using Gel Press and Pebeo Paints, Art Tutorial 17

By Lynne Suprock

This is an AMAZING gift idea, and so simple to do.  Seriously...simple!  I got to thinking after a friend posted pictures of a few favorite dinnerware pieces found at a popular retail store.  I loved the pieces as well, but could never happen upon them while out.  Part of shopping for me is the thrill of the hunt....so, yeah, I could've ordered some online, but did not.  Instead, I thought I would try my Pebeo Paints, Porcelaine 150 for ceramic, combined with my Gel Press for monoprinting and give it a go myself.  I collect eclectic stuff as well, so this was as eclectic as they come.

Here is an image of one of my pieces.  Follow the link to learn a few of the how-to tips and supplies used.  Happy creating!


Thursday, March 29, 2018

Soldering Tutorials - Art Tutorial 16, Extraordinaire, By Lynne Suprock


Soldering Tutorials- Art Tutorial 16, Extraordinaire

By Lynne Suprock

Over the past few months, I put together four simple, but popular videos that feature the "How-To's" of basic jewelry soldering techniques.  These techniques are not my own innovations.  The process of soldering has been around for dozens of years and used in various art or commercial media.  It takes practice and lots of work to incorporate this media into your own awesome projects 

These basic videos come in handy for students who want to learn the basic how-to's of soldering before completing projects in a class.  Click each link and watch these short and sweet, easy- peasy tutorials and ENJOY!


Sunday, March 18, 2018

How To Alter A FLAX Bag Into A Wearable Frock: Art Project Tutorial 14


How To Alter A FLAX Bag Into A Wearable Frock: Art Project Tutorial 14

by Lynne Suprock


SEW.....  not much around here stays plain for very long.....

A few months ago a good friend sent me a few things from her local FLAX boutique.  Let me say, "I LOVE, LOVE, LOVE, LOVE, FLAX clothes" and was sew excited when the package arrived.  Anywho, there was also a plain cloth bag that arrived in the package along with my ensemble, and although it was FLAX awesome as well, it screamed for a chance to live the dream of being an actual supercalifragilistic FLAX wearable.  

And "SEW" again……….  I decided to give it a whirl and set out to alter the hungry little bag into a marvelously stitcherized frock!  Apologies. I don't have my image of the bag in its before state.  Close your eyes and imagine a basic sac with handles, tag on the inside.  OK? Ok.

First things, first.  Let's turn it inside out to see that adorable little FLAX tag. Yep, let's leave the tag showing! Next it was time to tear out the bottom bag seams and then cut the fabric off, straight across the bottom.  That gave me some extra fabric right away. I used that fabric to create a few free motion stitched appliqués as add-ons.  


Next it was time to remove the bag handles and stitch them on their opposite sides, to use as jumper shoulder pieces. I also removed the side seams so I could later add 3" from the shirt mentioned below, to have better movement under the arm part of the piece. Heart flower motifs made nice appliques, so a few were added and eventually sewn with black thread and free motion stitching. 


This is where things got a little crazy because it was time to introduce my FLAX hybrid to the make or break supercalifragilistic moment regarding a must have union with a neutral colored thrift store shirt.  (Men's size large). I cut two, 2" strips, from the shirt and free motion stitched the word “wirth” to one of those strips.  Both of the strips were positioned in the back, their ends sewn between the repositioned bag handles, to keep it all from slipping off my shoulders later.  


Out of the rest of the rest of the shirt, came two side panels under the arm areas and a purposefully uneven strip to add to the bottom.  Too plain again......so I free motion stitched some more hearts, in black, along the bottom of the added fabric.   The string of hearts matched the free motion appliqué designs earlier placed on the front of the frock.


A little bit of tidying loose threads and hemming it all up, ahhhh .......and voila.  


This was a fast, free, and fun frock to make and layer over another smock or wear over leggings. 
And yes, indeed, I paired the outfit with one of my little purse necklaces.  Yum.  Kudos to the photographer!

Frock Over A Smock...


A Different Look Over Leggings...


Follow me on FB where you can instant message me with any questions.  I also have an Instagram page at lynne_suprock

If you like video tutorials, join me for a few on www.youtube.com/user/lsuprock

Stay tuned for the next Segment, with more stories, images, and tips throughout the weeks and months ahead

Tuesday, November 14, 2017

How To Solder A Jump Ring To Any Charm: Art Project Tutorial 11, by Lynne Suprock

How To Solder A Jump Ring To Any Charm: Art Project Tutorial 11

by Lynne Suprock

I've been soldering for more than a dozen years, beginning with making stained glass pieces.  At first I took a class just to have fun and releive some of the stress from a clinical day spent with my students on a critical care unit. After the first class, however, I was hooked.  Combining the beautiful glass colors with the magic of molten metal was fascinating and satisfying.  It became a regular part of my mixed media creating.  Charms are lots of fun to create!

Today, I want to share how to get that pesky jump ring onto that gorgeous charm you've created.  It goes without saying that practice practice, practice makes almost perfect.....so don't give up after a few tries.  Keep practicing.  Hopefully a few tips and this close up video will help a bit.


What you will need is spelled out in the video.  Just know that you do not have to use the same products shown.  For instance, there are many flux brands and cleaner brands out there.  You will find whatever things work for you in your practice. I do use my own jig A LOT so I put up the link in case you would want one too.  They are adjustable and eliminate the need for a third hand device, which never worked very well for me, anyway.  The jigs also are great for securing rings with empty bezels to pour level resin!  

Click on the link below for the 4 minute tutorial video.  Feel free to like and subscribe for more free tutorials on my YouTube Channel, as well. xo


Follow me on FB where you can instant message me with any questions.  I also have an Instagram page at lynne_suprock

Stay tuned for the next Segment, with more stories, images, and tips throughout the weeks and months ahead