Recent Posts

Monday, December 30, 2019

Kids Art As Charms, by Lynne Suprock

Kids Art As Charms
By Lynne Suprock

Our eldest grandson will soon turn seven.  This is an in between age, where play takes on goal oriented purpose and give those around can a sneak a peek at what sparks imagination and excitement.

Our little guy loves art projects and has become quite attentive to detail and color.  I was gifted a beautiful piece of scratch art recently, and, of course, thought it was the quite a beautiful piece of his creative art.

Since I love charm making and shrinking family pictures, pets or..... yes, even grandchild art, I thought that I would make myself a bracelet out of my gift.  I added beads make using Apoxie Sculpt and a special paint process.  A few buttons and sparkle and voila, nicely finished. 

HAPPY CREATIVE NEW YEAR!


For soldering jigs, perfect for hands free charm soldering, go to: 

Thursday, November 14, 2019

The Little White Dress, Art Tutorial 23, by Lynne Suprock

The Little White Dress
Art Tutorial 23

By Lynne Suprock

I have in my closet, two little black dresses that I adore.  So simple but elegant.  The legacy of all little black dresses, yes?

Well, today I decided that white would suit a simple mixed media project I had been sleeping on for awhile now.  My friend and neighbor, Brenda gifted me two small Ginny Dolls.  They were in very good condition and so were their little clothes.  I studied them for a few days and decided to reproduce them to use in a jewelry project.  

White would be perfect, so that I could add color easily if I wanted to later.  To do this, I needed molding compounds.  First, I needed to cast the dress, then fill the impression with a durable product that when finished, could be applied to little books or worn as jewelry.

The products I chose were Knead-A-Mold and Apoxie Sculpt, Super White.  I demo how to make the little white dress below, on my YouTube channel.  Click and Enjoy!


Wednesday, October 30, 2019

Make It Artsy With Lynne Suprock, Making Chihuly Like Ornaments Art Tutorial 22

Make It Artsy With Lynne Suprock, Making Chihuly Like Ornaments Art Tutorial 22

Well, season five of the show, Make It Artsy, on PBS, did not disappoint!  There are several talented instructors giving wonderful project instructions.  All PDF's for any of the episodes, whether the full videos are still shown on their website or not, are available through their website.  For the PDF written instructions for this whole project go to:

http://www.makeitartsy.com/projects/Make_it_Artsy_Series_500/503/Make_It_Artsy_503-2.htm

For season five, I completed and aired three projects with Julie Fei-Fan Balzer.  It was so much fun in their studio, surrounded by so many talented people.  One of the three projects was to create Chihuly inspired ornaments to float in ponds or to hang in trees.  The image below is a picture I took while at the Phipps Conservatory in Pittsburgh, PA for my inspiration. If you would like to see how I created my look alike,  just click the below the image!  Enjoy!


 https://www.youtube.com/watch?v=a3vByOoTqzs&t=5s

 Click Here!

Friday, September 20, 2019

Fast Image Transfer With No Rubbing, No Water, No Acetone, No Mess. Art Tutorial 21 by Lynne Suprock


Fast Image Transfer With No Rubbing, No Water, No Acetone, No Mess.  Art Tutorial 21
by Lynne Suprock

Yet again, one more time, for the 7th time, I filmed an episode with Julie Fei Fan Balzer on the PBS crafting show, MAKE IT ARTSY.
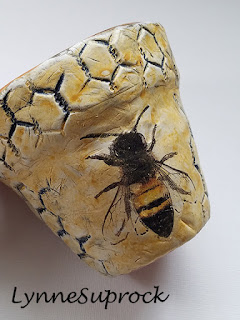
Such a wonderful time and how I loved meeting up with other creatives and filming these episodes.  In this episode I demo how to use Aves Fix It or Apoxie Sculpt to transfer images like toille and bees.

The last one aired is this September.  Check your local networks for Season 7 and tune in.  Also, for a complete written PDF of this project go to: 
http://www.makeitartsy.com/projects/Make_it_Artsy_Series_700/712/Make_It_Artsy_712-3.htm

Enjoy!


click here to view the how-to video:

Tuesday, June 4, 2019

Make Quick Enamel Buttons And Grab A Dish Towel To Add Pattern, Art Tutorial 20, By Lynne Suprock

Make Quick Enamel Buttons And Grab A Dish Towel To Add Pattern 
Art Tutorial 20

By Lynne Suprock


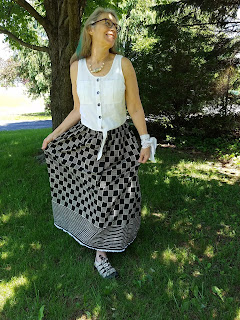
Who doesnt' love a sale?  I have a few things in my closet that are unmarried to anything.  They need their other half to make a fashion statement, or at least, match.  Earlier in May, I found this cool little top that I thought would match a skirt that had been hanging in my closet for 2 years.  

When I got home, I still thought, aw.... something just isn't right.  It is too plain.  That's it.  So let's make a few alterations... just a couple.  Begin by removing these wooden buttons.  Maybe they can be a part of another project someday.


Take one of the buttons and trace onto a piece of copper.  Cut out each of the circles for your new buttons using metal cutting shears.


Mark two divots into the copper for each button, using a scribe.  Then using a metal punch, 1.8mm, punch your button holes into the copper metal.


Using a metal file, and filing in one direction, clean up and smooth any rough edges around the button.


Now its time to do a bit of quick enamelling.  I will make the buttons a glossy black with a white piece to give a geometric look.


You will need Kry-Fire or fine mist hairspray, a mesh strainer, enamel tivets, safety goggles, kiln tweezers to remove trivot and your enamels, and the kiln.  Firing temp will be 1385 F for about a minute and 30 seconds or until the enamel appears smooth when peeking in the window with safety glasses.  If the enamel appears to have orange rind skin, leave cook a few seconds longer.


Apply the spray adhesive lightly then use the strainer to tap enamel onto the metal.  Lightly spray and apply another coat of enamel.  Give a third and final light spray.  Carefully repeat the same process to the other side of the button and set on trivet and place into kiln.


Once fired, spray lightly and add one more coat of black enamel.  Then place the white stringer piece of enamel to the top of the button and fire in the kiln.  No need to apply anymore enamel to the back of button.


Here are the buttons, two front views and two back view.


I had created the buttons to tie in the geometric pattern of my skirt, but not exactly look the same.  It is just enough to pull the eye up.


Similarly, I wanted to add a bit more of the top's color into the skirt.  I chose a simple band of lace and sewed it to the bottom of the skirt to accomplish this.


So far, sew good.  hehe.  There was a bit more work that I wanted to do to the shirt.  I had been saving an old and worn thin, kitchen towel that would give quite a bit more interest to the shirt. Hmm. Yeah, so let's go ahead wth that!  I cut out the dish towel around the center image, turned under and ironed a fold, then pinned it to the back of my top.  I sewed around the piece three times for a bit of a tattered look rather than use straight stitching. Lastly, I outlined sewed the horse in the image to keep things in place, and again, add a bit of interest.


So as to not waste much, I tore a strip from the remaining part of the dish towel to make a piece of fabric bracelet for the wrist. 


Now let's get out a little paint and a stamp!  I used a Gel Press Plate as a giant inkpad to hold a bit of DecorArt So Soft Fabric Paint which I applied with my brayer.  I chose these colors...


I used a cool patterned wooden stamp from Artistic Artifacts, dabbed it into the paint and pressed it firmly onto my fabric.


Do this stamping several times over the cloth in different colors, overlapping the pattern.  Let air dry then press with hot iron, no steam to set the paint.


After all the work it is time for dressing up and going out with friends.  I loved how it all came together.  Hope that you all enjoyed and gained some inspiration to try a bit of altering yourself.


Transforming An Ordinary Coat Into a 1940's Princess Coat, Art Tutorial 19, By Lynne Suprock

Transforming An Ordinary Coat 
Into a 1940's Princess Coat, Art Tutorial 19

By Lynne Suprock

Ou la.  There are several steps to transforming this community thrift store oversized woolen coat.  I put it all in this video...  Enjoy!


https://www.youtube.com/watch?v=uU2gnBzgv0A&t=19s