Recent Posts

Saturday, October 15, 2016

Art Project Tutorial 5: Princess Whisperer, Mini Tiara Necklaces

Art Project Tutorial 5: Princess Whisperer, Mini Tiara Necklaces

By Lynne Suprock

For anyone who knows me, I have been making mixed media tiaras for years.  Some are for charity, some for workshops, some for friends and some for myself.  Some are with rhinestones, some with Apoxie Clay, some with wire. Many art sisters have shared my interests in these surreal fashion statements.  Recently, I was excited to have an article appear in this summer's Belle Armoire Jewelry Magazine, featuring a step by step tutorial and a few of my mini tiaras as pendants.  


My inspiration for these little lovlies come from childhood.  I used to study the musicals on television for costuming.  Anything to do with glitter and flounce instantly had my attention.  Then, of course, there was the Wizard of Oz, with all the glitz that came with those Ruby Slippers.  Although they were nice,  I focused on that splendid, over the top crown, Glinda, the Good Witch wore! Oh my my!

There are lots of princesses in the movies, cartoons and in real life. In every dress up trunk or halloween store, you will find a tiara or two.  In my studio, you will find several..... along with some tap shoes.

TIPS:  Use a thin beading wire for crocheting the delicate necklaces.  

In addition to a third hand, wear a thick cotton pair of garden gloves when soldering the wires for the little rhinestone tiaras. This helps you to manipulate the hot wires for a short time without getting burned.

Follow me on FB where you can instant message me with any questions.  I also have an Instagram page at lynne_suprock


Stay tuned for the next Segment, with more stories, images, and tips throughout the weeks and months ahead


Friday, October 14, 2016

Art Project Tutorial 4: Soldering Glass, Porcelain Charms, and Oprah......

Art Project Tutorial 4:  Soldering Glass, 
Por­celain Charms, And Oprah...

By Lynne Suprock­­

I first learned how to solder glass back in the 90's, designing beautiful stained glass pieces.  The process was 
a-m-a-z-i-n-g. However, I have always been about the tiny, so it was natural for me to shrink down the designs to charm sized lovelies.  


Along my art journey, I met Carol Novak, and she encouraged me to make charms that were more personal, as that was what she adored. Another opportunity came when my good friend, Cheryl Hayes, wanted a few momentos of some cherished Boxers. 


I made family portraits, art work and general affirmations small enought to wear on bracelets and necklaces.  I began adding the charms to head pieces and matching magical wands, such as the one below. One thing that was crucial.....using no lead solder in the jewelry making for my friend and for others for obvious health reasons.  And so it began......


Soon after the birth of Simply Pretty Stuff, I decided to try my hand at sending a few marketing pieces to celebraties. Oh my! I sent a few pieces to Ellen DeGeneres and to OPRAH.  Why not give that a whirl, right? (BTW, I would not reccommend this as a marketing strategy for anyone.  I don't know WHAT I was thinking!)  

Ellen's charms turned out amazing.  I had photoshoped her onto the cover of a few magazine titles since she had mentioned on a show that she had wished to be on one of them at some point. She did recieve my package, and I got a call from her agent with a small thank you.  I also got asked how I knew her personal address. Guess I was good at research?!  sigh.  No follow up or written correspondence came after the call, so I was a bit dissappointed.  

The piece I made for Oprah, I also made and sent a duplicate to Stedman Graham, her friend at the time.  My box was returned from Oprah's studio unopened, but I recieved a delivery confirmation for the one I sent to Stedman, and it was never returned.  We will never know if he really got the package or if Oprah ever saw the charm necklace.  Such is life and my attempt at impressing the stars!!  Sigh. The duplicate necklace is seen below.


No time for feeling blue over not being part of the Hollywood crowd's couture....... it was on to other things.  Soon after, I was contracted to use the art of Brian Andreas and the StoryPeople to incorporate Brian's art into ornaments and charms. How lucky to work the next few years with his team, creating with his art, his words, and affirmations, making them into pewter charms and soldered ornaments!!  I was over the moon to be able to have this opportunity with these wonderful artisans!! 


Fast forward to today, where I now enjoy creating a variety of mixed media art.  My heart sings when the solder flows and I love to change up the norm and the rules whenever possible. I have enjoyed seeing some of my soldered pieces in the Stampington Publications and continue to teach classes sharing techniques.


SOME TIPS:  Its always a good idea to have adequate ventilation in the room you are working and to wear a solder fume mask and run a carbon filter when you flux and solder, even with lead free solder.
I use a white paste flux that is water soluable to brush onto the copper foil for prepping.  Paste flux stays in place and is easier to clean off the piece when finished.  It is also less toxic as it is a weaker acid. The least expensive I found to work well is Worthington found at Lowe's hardware store.   
The pieces above were done using a soldering iron.  You can also use a torch for other projects.  I have done so in my workshops making little books with solder.
To make the beads, every artist has their own technique.  I like to make sure the solder is on the piece.  Then I clean the piece well with baking soda and water and then rubbing alcohol.  I add a plop of solder where I want a bead.  Then I brush a bit of flux onto the plop of solder just laid.  I quickly touch the plop of solder with the iron and it melts down a bit, leaving a nice bump!

Follow me on FB where you can instant message me with any questions.  I also have an Instagram page at lynne_suprock


Stay tuned for Segment Six with more stories, images, and tips throughout the weeks and months ahead


Thursday, October 13, 2016

Art Project Tutorial Using Apoxie Clay In Bookmaking

Art Project Tutorial 3:  Using Apoxie Clay in Bookmaking

By Lynne Suprock

Creative clay inspiration began a while back... in kindergarten and elementary school art class days. My favorite was the air dry grey colored clay.  With it, I made elephants, hand print plaques, and a few mugs.  (Oh my!)


Since then, there have been so many sculpting products developed for art use.  My current favorite is the Apoxie Clay from Aves. https://www.avesstudio.com   I’ve used Aves products in my design work with students, making tiaras and altering glass bottles.


As well, I took a workshop with Michael DeMeng, while I working at an Art Is You event in 2012, and became exposed to the “creature factor” as another way to use this epoxy clay product ….how fun! 


So, the thing is, this stuff is terrific to use for creating altered book plates and making little book pendants! Being able to stamp into it, mold it, and have it adhere to almost anything, makes it work very well as a creative medium.  These are some of my little books featured in PAGES, a Cloth-Paper-Scissors publication that shows how yummy the stamping actually does look.


In 2013 I created a larger version of Apoxie Clay book, with movable parts, for a workshop that unfortunately was cancelled due to schedule conflicts. These books actually had draw bridges and doors.   


Below there samples of a few little books made with metal and an Apoxie Clay binding.  They are similar to the one seen in this summer's issue of BelleArmoire Magazine in an article  collaboration with art sister, Cat Kerr. www.stampington.com


Here are samples of other books using this wonderful product!


SOME TIPS:
For all of the books shown, I used either Aves Apoxie Clay Sculpt or Apoxie Super White.  These clays are a 2 part epoxy type that air dries and hardens, noticeably so in just 2 hours.  

When working with 2 part Epoxy Clay, always wear gloves.  It will absorb into the skin in its malleable state. The clay is very sticky as well, so work on a non stick craft mat.

Choose a surface to adhere the clay such as heavy cardboard, chip board, balsa wood or metal.  Something with a little tooth is good.  However, I used 24 G copper for my book plates, so I sand the metal first.

When using your rubber stamps to make impressions in the clay, make sure to use a mold release spray prior to stamping.  

Be sure to clean your stamps with a toothbrush, warm water and a little dish soap when you are finished. Otherwise, the hardened clay will stick into the crevices of your rubber stamp.

If painting, use a thin coat of white gesso to prime the clay once it is dry first, and paint it with acrylics.  

For depth and dimension, use a little Rub-N-Buff or Guilder’s Paste over the acrylics on parts that are raised from stamping in the clay.  You may seal with a matte or gloss liquid gel media, but it is not necessary.


Follow me on FB where you can instant message me with any questions.  

Stay tuned for Segment Five with more stories, images, and tips throughout the weeks and months ahead. 

Wednesday, October 12, 2016

Art Project Share 2: Soldered Little Books

Art Project Share 2:  Soldered Little Books
Inspiration, images and tips

By Lynne Suprock

When I was a little girl, I wrote stories for, and read them to my dolls.  I used shirt cardboard and crayons and of course there had to be glitter in the making of them.  Today, I still love these little books and have been lucky enough to make a few of my own dolls, so that they may each have a book or two or many.....actually I have book cases for them!

As an artist with tremedous tool spirit, I found that soldered metal became the perfect media for making strong little books, to display or to wear, so I could continue my childhood book making obsession.  I also love the idea of using scrap leather to make the binding and transferring images to make my own titles.  Being able to write my own stories inside is just icing on the cake. A special touch to the front covers are recycled family jewels in the samples below.


Certain people in my life have also been true inspirations, not only as artists, but as friends.  I am blessed and I love to give back when I can.  It has been a rewarding and fulfilling experience to make a meaningful piece for people who mean so much to me.  


Another inspiration comes with product.  I met a fantastic beadmaker when I was teaching workshops and vending at Beadfest, Philadelphia,  Heather Boardman of HMB studio.  I fell in love with both Heather and her beads.  They became part of my book plan for a series incorporating" Kaloops". See beautiful examples of Heather's Kaloops online at:

                              http://www.hmbstudios.com/


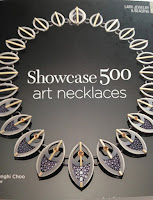
As well, there is a bit of ego involved when it comes to challenging myself with my work.  I am my own worst critic but that ego drives me to a better place and gives me the persistance I need to create outside the box.  A couple years back, I entered these books for publication in Lark Books.  Yay!  I was very excited to be accepted with book pieces published. I remember taking a day to savor the moment, patting myself on the back, then moving on the next day to work on my next idea!  


SOME TIPS:  When soldering for wear, use a lead free solder and one with a higher silver content.  Silvergleem by Canfield is a good option.  There are others available as jewelry grade, as well.  Always use good ventilation, wear a solder fume mask and run an air filter to prevent absorbing any smoke or fumes into your lungs.

The hinge apparatus in some of my books are metal tubes, cut to size and soldered to both front and back plates.  A hand formed wire then slides in and out of the back tube.  A spiral prevents the wire from sliding completely out.  Experiment with different closures.

When heating the fluxed copper plates, make sure you bring the copper up to temperature before applying the solder so it flows easily across the metal.  For these books, you need only to solder the front part of both plates.

Follow me on FB where you can instant message me with any questions.  
Stay tuned for Segment Four with more stories, images, and tips throughout the weeks and months ahead. 


Tuesday, October 11, 2016

ART PROJECT SHARE 1: SALT SHAKER CHIC

Art Project Share 1: Salt Shaker Chic
Inspiration, images and tips

By Lynne Suprock

I began soldering in 2002 because I wanted a stained glass window piece for my home. Once I began designing and cutting the glass I was hooked.  

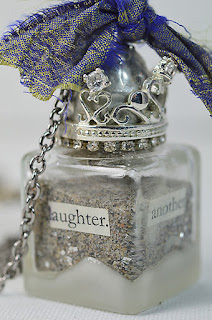
Soldering glass shifted to making creative mixed media with a focus on jewelry. One of the things I enjoyed making along the way were small bottles as vessel necklaces. 

Also, along my art journey, I came to know the Art Girlz, Tracy and Allison Stilwell, and ordered many of their beautiful pewter charms a few years back. I particularly liked the little faces and was excited to use them in some of my soldered jewelry.  

Sadly Allison passed away in May 2014. Her sister Tracy, and partner Midge Baudouin, continue to celebrate her life and art.   Allison's philosophy in life was to spend time doing what you love. So, in that creative spirit, these pieces were designed and made in celebration of life and in doing what you love.


SOME TIPS:  What makes these little glass necklaces so yummy is the last step.  An icing like coating is made with Amazing White Casting Resin. This product, by ACP, is a quick setting, two part resin.  Then by adding just one drop of colorant when mixing part A and part B, the coating will be almost translucent.  
After dipping its bottom into the resin and letting excess drip away, make sure to set the salt shaker bottle onto a non~stick surface.

Follow me on FB where you can instant message me with any questions.  

Stay tuned for Segment Three with more stories, images, and tips throughout the weeks and months ahead. 


Monday, October 10, 2016

SHARING ART PROJECT STORIES, IMAGES, AND TIPS


SHARING ART PROJECT STORIES, IMAGES, AND TIPS

by Lynne Suprock


I have had a blog hiatus here in Simply Pretty Stuff land.  I had been on a how-to blogging role, while on the Amazing Crafting Products team, awhile back.  However, life spilled over a bit this past year... like too much fizz from a root beer float.  The fizz tastes good and is easy to enjoy, but there is a sticky mess that sometimes occurs  when it spills over.

Life can be sweet, but there are belly aches and clean up after the the fizz sometimes.  Sometimes its like that, right?   Choices need to be made, and responsibilites are always at hand. between the fizz and the table mess. there is the want of balance with it all.

So these past months were filled with sweet inspiration and blessings indeed......creating Art, publishing, teaching and connecting.  But on the flip side, there were dark, sticky days, emotional family storms, and loss of a very precious one, who had not had the chance at life's very first breath.  There are no words for this.  There is no forgetting this.... but as I said, life is about balance and memories, whether they be happy or sad, are part of what we strive to balance in our lives.

OK...........so, upon my return to blogging, I have decided to begin a sharing journey, featuring a few pet projects.   I already get to do some of this sharing when I write and am fortunate enough to get those articles featured in several of the Stampington Magazines.  I so appreciate their dedication to the business of couture, craft and wonderlust.  Their hard working editorial and photography staff are the best, as they give me a platform to share my work in such an inspirational way.  Special thanks to them always for giving me a voice and an opportunity to share!! (here is a link to their FREE projects. Check them out!) 


I also share when I teach live.  Thanks to the Art-Is-You Mixed Media Retreats, I have been excited to teach on both East and West Coasts, and have been able to meet and surround myself with extraordinary people, teachers and students alike.  Thanks always to Sal and El for those opportunities. (Here is my link to the Fall Retreat.) 


Awhile back, as mentioned, my blogging became a vehicle for sharing projects through the ACP team.  This was great fun and insightful to me. I became more comfortable with videotaping how-to's and the applications which allowed yet another form of artistic freedom. Thank you Susan Brown to make this learning and sharing possible. (Here is a link to the ACP blog with lots of inspiring ideas.)


I think it also very important to mention that I was also lucky enough to discover a different type of sharing in the past two years. It was an eye-popper for me, truely.  My first event was on a whim, but gosh, it is now a must for me to seek out  art nourishment for my soul.  What is better than being in a group of like minds, all gathered with the intent to create?  It never occurred to me to take this time for my own self, to discover even more about my art journey, and how to BREATH as I do it.  We all need to breathe.

Well then, my first art camp, as it were, was with Coleen Colquhoun and Heather Brauner over in NJ.  We made dolls.  It was my FIRST art away from home sleep over (hehe) and doll making experience, and I loved every minute.  I look at my Minerva Penelope Shea doll every day.... I do. Colleen will also be teaching in Stamford, CT this fall, at the AIY retreat.  


My second experience found me at ReMe, with Jean Skipper, Jodi Ohl, and Teresa Zurku, taking charge of a fun filled week for a dozen art sisters in flip flops!  It was where I went, not as a teacher, but a total student and groupie, just relaxing, creating and sharing tricks, tips and snippets of my own life with others who enjoyed doing the same, enjoying GREAT food and a few fun cocktails.  


My most recent experience was with a couple of famous, famous, did I say famous? doll gurus, Marlaine Verhelst and Ankie Daanen, at art sister, Annie Hesse's beautiful art home, in Florida.  I came home with one beautiful doll completed and another as soon as my feet hit the ground off the plane!


So here we are.  You guys are out there creating somewhere, and we connect either by design or serendipity.  The thing is that we all matter, we all make a difference, unless we choose not to..... So, from here on in, take some of what I intend to artfully share .....a few images, project inspirations, and some tips, to maybe start a dialog.....with me or with others, and what would be great is to pay it forward, somehow making your difference as you go, as well. xoxo

OK Let's Share:  Prepping For These Enamel Candy Coats

Wow, I have been making little books since 2007.  They were rudimentary at first, and have evolved using whatever media I could experiment with at the time.  These have been one of my favorite things to create since having a shelve of teeny weeny miniatures for my doll house, oh... about 102 years or so ago... only I like much more to wear them now.  I will most likely talk a lot about a lot of the books that I make in my studio.  You will also see a few glittery things, tiaras maybe, and definitely recycled ammo.

For this particular project, I would like to say, that I brought the idea to a friend in a brainstorming session.  We made quite a few samples and ended up co-teaching several classes together, while I wrote the steps creating the book,  she helped me create the beautiful enameling- trial and error and lots of fun. I love the look of these little gems.  They look like candy.  


SOME TIPS:  Before enameling, this or any other piece of copper, cut out the copper using a jeweler's saw. Use your dominant hand and keep your wrist limp as you move the blade up and down.  Be sure to match your blade with the gauge of copper. Sand the copper, and then wipe clean with alcohol, or use a product called Penny Brite, before applying the enamel with a sifter.  ALWAYS WEAR A MASK WHEN ENAMELING because you do not want to breath in the fine glass dust. 

Follow me on FB where you can instant message me with any questions.  

Stay tuned for Segment Two with more stories, images, and tips throughout the weeks and months ahead. 


Sunday, October 9, 2016

Lynne Suprock: A Mixed Media Expose

Mixed Media Work:   Hours of What if's, 
Days filled with Dreams, Mountains of Ideas, The Fits of Creative Hoopla, 
and The Privilege....

of creating.  

I am one of the lucky ones.  In a period of life, where I can get a second chance to change the world on yet a different platform.  It doesn't happen like this usually, so I am indeed....lucky.  

I have been blessed to discover others with this sense of passion that believe the same about art.  We may sometimes find ourselves walking on different paths to get to a similar place, but that's quite OK.  Some walk quietly while others beat a drum.....some work hard to earn a living at art, and some create in their precious moments in between family, school or other jobs, but either way, it is with that same amount of passion.  Like a flower, starting from a seed, however long ago planted, and now must take the time and make the room to grow.  Yes, I said, "must."  There is a sense of urgency, but at the same time a sense of wonder and calm as art transforms us and gives us the strength to bloom as we reach life goals. 

 Most of the people that I have met, both artists and students, are the kindest, smartest, bravest, hardest working, and definitely most creative people - ever.  I never imagined, and now am honored to be among...


Simply Pretty Stuff began in 2007, with a click of a button to get that business name and the necessary tax ID.  Gulp.
Family and friends have been nothing less than supportive and encouraging from those early days forward.  It was a bit overwhelming with all that needed to accomplished, and all of it seemed to be needed to be done all at once! To make some kind of difference in the world, using art now as my venue, I had to exist beyond craft or hobby; I had to invent, create, and prototype, so that I could  teach and help others realize their own potential in the creative process.  Well, mostly I had to, at some point, get out of my basement!  I worked three years there before finally getting a dedicated work area of my own.  Time flew.

In my opinion, sometimes creating or buying art heals, sometimes being in a room with creative people with like minds heals,  sometimes just working with your hands and making something out of nothing heals, and for me, the healing part of the equation is key.  The healing is about writing, teaching,  helping, and it is about the sharing. 

On any night, you may finding me inventing or reinventing in the studio when the neighborhood is asleep.  Its summer now, so the spiders cover the screen door to my space.  I don't mind them.......from a distance.  About midnight, they are hard to dodge so it is not a pretty sight when I have to get back out that door.  ick.

I tell you this because many of my art brothers and sisters are also up creating during the wee hours.  The mind is always asking "what if?" so we keep on going.  Resin needs poured, hinges need reworked, clay needs shaped, metal needs soldered, and wait.....the kiln needs to cool!  It is somewhat comforting to know that during that time, if needed, you can FB or call a friend who is not sound asleep like the rest of the world.  Just knowing that makes me smile.  Okay, and knowing others may think this a bit too crazy, also makes me smile.  Not so crazy for me I guess, if you actually know me.  Back in the day, my preferred clinical shift was always 2-12 AM, when I was most energized and efficient. Some things don't change.

Eight years have passed and lots has been published, much has been taught, friends have bonded.  I have never worked so hard and loved every minute.  However, the path is forking again and I see some new ideas ahead.  I have a sense of urgency this time to gather all the threads of these two "helping" worlds and bring things a bit forward.  It is time to concentrate on that business aspect of the path as well.  Some changes are ahead and I am challenged and inspired to do so.  I had just read a friend's post today, which made me think a bit and then respond.......
"to know what calms or inspires us is like having a superpower that not all folks have or can manage"

Reach out your hand, in whatever walk of life, past or present, and help others find their superpower, so that they can know calm or be inspired.  Mixed Media has helped me find my superpower so that I can bring some calm and make a bit of difference in someone else's world.

If you'd like to see the mixed media art that inspired me to write and teach, here is a sample of what I have worked on to create, mostly in the last 4 years.  It is not all of it, but enough of it to look at without putting you to sleep.  Now get a bit of your art on!  xo